

User Interface and User Experience
Designing a complicated interface requires a few iterations and days of living with those design choices before assessing their validity. Engaging the user in fun and beautify interfaces provide a positive experience that will hopefully result in more repeatable application engagement. Most users will have little patience for a poorly design UI or one that isn't reliable and crashes all the time. Here are some of the ways we approached the UI and UX design for the CoffeeNotes App.
App Navigation
When you start an application you should go directly to the key activity that the user will want to start with. Splash screens or dashboards are not recommended do to the time and effort needed just to get to the activity that the user wants in the first place. CoffeeNotes starts directly with the Calculator page that sets up how you will be brewing your coffee. Tab navigation provides quick access to the three elements that assist the user in brewing that perfect cup of coffee; Calculator, Timer and Usage. All three of these elements can be quickly selected by touching the tab bar or swiped from left to right.
At the application level, the Navigation Drawer slides out from the left edge of the screen with a menu that selects and starts the different category of Activities. The graphic below illustrates this navigation pattern as a sequence of screen shots.
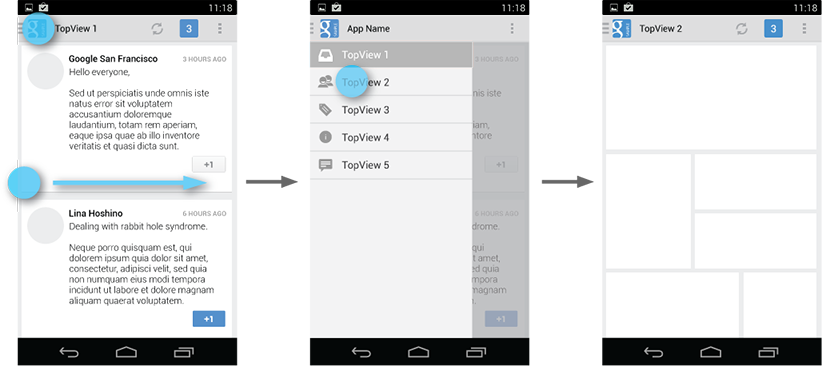
Users can open the drawer panel by touching the navigation drawer "hamburger" indicator, taken from the Android developer website
Activity transitions
Activity transitions are another way to convey navigation principles to the user. When selecting sub-category from the Navigation Drawer the current view slides to the right at the same time as the new view slides in from the right. These sub-categories display a back button instead of the hamburger indicator and behaves intuitively by sliding back from the direction the view entered. The transition animation and sliding direction and overlap all give a natural feeling when navigating to these sub-categories.
protected void onCreate(Bundle savedInstanceState) {
	Bundle translateBundle = ActivityOptions.makeCustomAnimation(getApplicationContext(),
    		R.animator.slide_in_left, R.animator.slide_out_left).toBundle();
	Intent intent.addFlags(Intent.FLAG_ACTIVITY_REORDER_TO_FRONT);
	startActivity(mIntent, translateBundle);
	// req'd for overriding main Activity already instantiated
	overridePendingTransition(R.animator.slide_in_left, R.animator.slide_out_left);
}
Resource files are used to define the transition using the following XML code. In addition to the translation, the previous screen is dimmed using an alpha animator that gives the impression of being below the new screen as it enters.
<!-- slide_in_left.xml -->

<translate xmlns:android="http://schemas.android.com/apk/res/android"
    android:zAdjustment="top"
    android:fromXDelta="100%p"
    android:toXDelta="0"
    android:duration="500" />
<!-- slide_out_left.xml -->

<set xmlns:android="http://schemas.android.com/apk/res/android" >
  <translate xmlns:android="http://schemas.android.com/apk/res/android"
        android:fromXDelta="0"
        android:toXDelta="-50%p"
        android:duration="500" />

    <alpha
        android:fromAlpha="1.0"
        android:toAlpha="0.5"
        android:duration="500" />
</set>